Models are often used to create characters, creatures, objects, furniture, and such.
A model is made of blocks you can position, rotate, size and paint as you wish.
You can open a model in a tab by double-clicking on it in the project asset list.
Deprecated wiki[]

This wiki is not official
The official wiki was learn.craftstud.io, but that wiki has since been discontinued.
The contents of this page may be outdated, so continue at your own risk.
Creating a new model[]
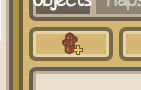
Click this button to create a new model
Once you've joined a project, you can create a model in the home project tab by clicking on the little red guy with a plus on it (see picture).
In the popup that appears, enter a name for your new model. When done, it will appear in the project asset list. Double-click to open it.
Adding your first block[]

Start by creating a new block by clicking on the cube with a plus in the top right corner of the tab (see picture).
A popup opens, choose a descriptive name for your block or just leave the default for now if you're not decided yet. You can always rename it later.
Editing models[]
The model editing interface has a tabbed pane of the left. You can switch between three modes:
- The Build mode is for placing the model's blocks. It allows moving around, resizing, rotating block shapes.
- The Paint mode allows painting your model's blocks.
- The Animate mode allows posing your model on a timeline to create animations.
Build tab[]
The build tab allows setting up block properties and laying out blocks on the texture. Note that it is in this tab where you set the size of the texture, as well as the positioning of the elements on the texture.
Texture block[]
This block allows setting the size of the texture, as well as the placement of elements on the texture. First set the width and the height you require and then place the elements as needed.
The placement of the elements is done as follows. To move an element on the texture you need to first select the element either in the preview or in the tree view. The outline of the element on the texture should at this point be highlighted. Hover the element on the texture and then drag and drop it at the desired position.
Model block hierarchy[]
Blocks you create can be parented to each other (todo: add screenshot). The parent's transform affects its children. It's particularly useful for animation.
To change a block's parent, just drag'n'drop it to its new parent in the block list on the right of the window.
For instance, when building a character, you'll want to parent the forearm to the upper arm, itself being a child of a shoulder block. The shoulder could be parented to the torso. In most biped characters, the root block is the pelvis. You can easily move around the whole character by just dragging the root block.
Paint tab[]
The paint tab allows painting your model's texture. Note that before painting the texture, you should place the elements on the texture as needed. The placement is detailed in the Texture Block under the Build Tab.
Just click on the texture to paint. You can hold Shift down to draw straight lines.
Right-clicking on a pixel will pick its color.
Animate tab[]
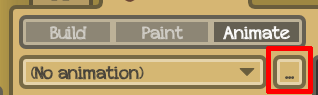
Browse animations
Start by creating an animation for your model. Click on the "..." button (see picture on the right) to browse model animations.
This will open a popup where you can create new animations and manage existing ones.

Tick animations you want to add to your model.
Create a new animation then make sure to tick it to add the animation to your model's animations list.
(to be continued)